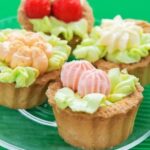
Are you looking to add a professional touch to your homemade cakes? Learning how to decorate a cake with piping tips is the perfect way to elevate your baking game. Whether you’re a beginner or an experienced baker, mastering the art of piping can take your cakes from simple to stunning.
Piping tips are a versatile tool that allows you to create intricate designs, beautiful borders, and even personalized messages on your cakes. In this article, we will explore the basics of cake decorating with piping tips, from gathering the necessary supplies to troubleshooting common issues and adding finishing touches. By the end of this guide, you’ll have everything you need to create show-stopping cakes for any occasion.
Understanding the fundamentals of using piping tips is essential for achieving professional-looking results. We will cover everything from selecting the right supplies to mastering different piping techniques and creating intricate designs. Whether you’re decorating a birthday cake or a wedding cake, this guide will provide you with the knowledge and skills needed to impress friends and family with your beautifully decorated creations.
Gathering the Necessary Supplies
Choosing the Right Piping Bags and Tips
When it comes to cake decorating with piping tips, having the right tools is essential. Piping bags are available in various materials such as disposable plastic or reusable cloth. It’s important to choose a piping bag that feels comfortable in your hand and gives you good control over the flow of icing.
Additionally, selecting the right piping tips can make a big difference in achieving different designs. From round tips for writing and outlining to star tips for borders and shell designs, there is a wide variety of options to choose from.
Selecting the Perfect Icing Consistency
The consistency of your icing plays a crucial role in successful cake decorating with piping tips. If the icing is too stiff, it may be difficult to pipe intricate designs, while icing that is too runny can result in sloppy decorations.
It’s important to find the right balance by adjusting the amount of liquid or powdered sugar to achieve a smooth and easy-to-pipe consistency. For buttercream icing, consider using gel food coloring instead of liquid ones to avoid altering the texture of the icing.
Stocking Up on Essential Supplies
In addition to piping bags, tips, and icing, there are other supplies that can enhance your cake decorating experience. Cake turntables provide a smooth surface for easy piping around the sides of the cake, while couplers allow you to easily switch out different piping tips without emptying and refilling multiple bags.
To keep your work area clean and organized, have plenty of damp paper towels or a clean cloth on hand to wipe off any excess icing from tip ends or your hands while working. By gathering all necessary supplies ahead of time, you’ll be well-prepared for a successful cake decorating session with piping tips.
Preparing the Cake
When it comes to decorating a cake with piping tips, proper preparation of the cake itself is crucial to achieving a professional-looking result. Here are some key steps to prepare your cake before you even think about picking up a piping bag:
1. Leveling the Cake: Before you start decorating, it’s important to ensure that your cake is level. Use a long serrated knife or a cake leveler to trim off any domed or uneven parts of the cake layers. This will create a stable and even surface for decorating.
2. Crumb Coating: Applying a crumb coat is an essential step in cake decoration. A crumb coat is a thin layer of icing that seals in any loose crumbs on the surface of the cake, preventing them from ruining the final presentation. Use an offset spatula to spread a thin layer of frosting over the entire cake, then chill it in the refrigerator for at least 30 minutes.
3. Chilling the Cake: After applying the crumb coat, it’s important to chill the cake in the refrigerator for at least 30 minutes. Chilling helps to set the crumb coat and makes it easier to add additional layers of frosting without disturbing the cake underneath.
By taking these preparatory steps, you will create a solid foundation for your piped decorations and ensure that your finished masterpiece is as visually appealing as it is delicious.
Piping Techniques
When it comes to using piping tips for cake decorating, mastering different techniques can take your creations to the next level. One popular and versatile technique is creating buttercream flowers. With just a few different piping tips and some practice, you can add beautiful floral designs to your cakes.
For example, the star tip can be used to create simple rosettes or more intricate flowers like daisies and mums. The petal tip, on the other hand, is great for making realistic-looking petals for roses and other delicate blooms. Mastering these techniques can truly elevate the look of your cakes.
In addition to floral designs, mastering piping techniques for creating borders is essential for achieving professional-looking cakes. From simple lines and dots to more elaborate lace or shell borders, there are countless ways to add a polished edge to your cake using piping tips. Learning how to maintain even pressure while piping is key in creating smooth and consistent borders.
Another important aspect of cake decorating with piping tips is the ability to write messages or inscriptions on your cakes. Whether it’s a birthday wish, a congratulatory message, or simply labeling a dessert, mastering the art of piping writing is an essential skill for any cake decorator. Using the right tip and practicing proper technique will ensure that your writing is neat, legible, and adds the perfect finishing touch to your creation.
| Piping Tip | Design Created |
|---|---|
| Star Tip | Rosettes, Swirls |
| Petal Tip | Roses, Daisies |
| Round Tip | Writing Messages |
Creating Intricate Designs
There are several ways to use multiple piping tips to create intricate designs on a cake:
– **Layering**: Start with a base layer of icing using one tip, then add another layer with a different tip on top. This can create depth and texture on the cake.
– **Combining shapes**: Use different tips to pipe various shapes such as stars, flowers, or rosettes, then mix and match them to create a unique design on the cake.
– **Gradient effects**: Create beautiful ombre or gradient effects by transitioning between different colors of icing using multiple piping tips.
When using multiple piping tips, it’s important to practice beforehand and have a clear idea of the design you want to achieve. You can sketch out your design on paper beforehand or practice on a flat surface before attempting it on the cake.
By mastering the art of using multiple piping tips, you can elevate your cake decorating skills and create show-stopping cakes for any occasion. With practice and experimentation, you can develop your own unique style and become a master at creating intricate designs with piping tips.
Troubleshooting Common Issues
Piping tips can get clogged with icing when decorating a cake, which can be frustrating for bakers. To prevent clogging, it’s important to make sure that the icing consistency is just right.
If the icing is too thick, it can lead to clogging, so adding a small amount of liquid, such as milk or water, can help to thin out the icing and prevent clogs. If the icing is too thin, it can cause uneven piping and make it difficult to create precise designs.
Another common issue when using piping tips is uneven piping. This can occur when there are inconsistencies in pressure while squeezing the piping bag. To avoid this problem, it’s essential to practice maintaining even pressure on the piping bag throughout the decorating process. Also, make sure to hold the bag at a consistent angle and apply even pressure as you pipe.
When troubleshooting clogged tips and uneven piping, it’s crucial to have some basic tools on hand such as a toothpick or thin skewer to clear any blockages in the tips. For uneven piping, practicing consistent pressure with an empty piping bag before adding icing can help improve control. With a few simple adjustments and techniques, these common cake decorating issues can easily be resolved.
| Common Issue | Troubleshooting Solution |
|---|---|
| Clogged Tips | Adjusting Icing Consistency & Using Toothpick to Clear Blockages |
| Uneven Piping | Practicing Even Pressure & Angle with Empty Piping Bag |
Finishing Touches
Adding the finishing touches to a beautifully decorated cake can truly elevate its visual appeal and make it look even more impressive. There are several options for adding those final details, including sprinkles, edible glitter, and fresh flowers.
Sprinkles
Sprinkles are a classic way to add color and texture to a cake. Whether you choose traditional round sprinkles, shaped confetti-style sprinkles, or even metallic dragees, they can instantly enhance the overall look of your cake. Sprinkles can be applied around the edges of the cake for a simple but effective touch, or they can be strategically placed in specific areas to create patterns or designs.
Edible Glitter
For those looking to add some shimmer and sparkle to their cake decorations, edible glitter is an excellent option. Available in a variety of colors and textures, edible glitter can be dusted or sprayed onto the surface of the cake for a magical, eye-catching effect. Whether you want a subtle shimmer or a bold sparkle, edible glitter is an easy way to make your cake stand out.
Fresh Flowers
For an elegant and natural touch, consider adorning your cake with fresh flowers. Edible flowers such as roses, violets, or lavender can be used to create stunning arrangements on the top or sides of the cake. Just be sure to select flowers that are safe for consumption and have not been treated with any chemicals. Adding fresh flowers not only enhances the visual appeal of your cake but also adds a delightful fragrance to delight all the senses.
By carefully selecting and applying these finishing touches, you can truly showcase your creativity and skill in cake decorating with piping tips. Whether you opt for sprinkles, edible glitter, fresh flowers – or perhaps all three – these final details will take your masterpiece to the next level.
Showcasing Your Masterpiece
When it comes to showcasing your cake decorating masterpiece, presentation and photography are key. The way you present your cake can elevate its overall appeal and make it even more enticing. Whether you’re planning to display the cake at a party or event, or simply want to capture its beauty in photos, there are several tips you can use to ensure that your creation looks its best.
One important aspect of presenting your decorated cake is choosing the right serving platter or stand. Consider the theme or occasion for which the cake is intended, and select a stand that complements it. For example, a sleek and modern stand might be perfect for a contemporary wedding cake, while a vintage silver platter could enhance the beauty of a classic birthday cake.
When it comes to photographing your decorated cake, lighting is critical. Natural light tends to work best for capturing the true colors and details of your creation. If possible, position the cake near a window or take it outside for some well-lit shots. Avoid using harsh overhead lighting, as this can create unflattering shadows and wash out the colors of the icing.
In addition to presenting and photographing your decorated cake, consider adding some extra flair with complementary decorations such as fresh flowers, edible glitter, or sprinkles. These finishing touches can add an extra layer of visual interest and make your masterpiece truly stand out. By following these tips for presentation and photography, you can showcase your creative achievement in cake decorating with piping tips in the best possible light.
Conclusion
In conclusion, mastering the art of cake decorating with piping tips is a rewarding and creative achievement. With the right supplies, preparation, and practice, anyone can create beautiful and professional-looking cakes that are sure to impress friends and family. Whether you’re piping buttercream flowers, writing messages, or creating intricate designs, the possibilities are endless when it comes to decorating with piping tips.
Remember that patience is key when it comes to perfecting your piping techniques. It’s important to take your time and not get discouraged if your first few attempts don’t turn out exactly as you had hoped. With practice and perseverance, you will improve and develop your own unique decorating style.
Lastly, don’t forget to showcase your masterpiece. Whether you’re presenting your cake at a party or posting photos on social media, be proud of your creative achievement in cake decorating with piping tips.
Your hard work and dedication will surely shine through in the final product, and you may even inspire others to try their hand at cake decorating as well. So go ahead, celebrate your success and enjoy the sweet rewards of creating beautiful cakes with piping tips.
Frequently Asked Questions
What Are the Best Piping Tips for Beginners?
The best piping tips for beginners are usually the basic round, star, and leaf tips. These tips are versatile and can be used for a variety of designs and decorations. Starting with these simple tips allows beginners to practice different techniques and develop their piping skills before moving on to more intricate designs.
How Do You Decorate With Piping Tips?
Decorating with piping tips involves using them to create borders, flowers, letters, writing, and other decorative elements on cakes, cupcakes, and other baked goods. Different piping tips can be used to achieve various effects, such as creating ruffles, rosettes, or basketweave patterns. By practicing with different tips and experimenting with different icing consistencies, decorators can create beautiful and unique designs.
How Do You Pipe Designs on a Cake?
To pipe designs on a cake, it’s important to start with the right consistency of icing and a steady hand. Different designs may require different piping tips and techniques. For example, creating delicate filigree patterns may require a small round tip and careful precision, while making large buttercream roses may require a larger star tip and a swirling motion.
It’s also important to plan out the design in advance and practice on a separate surface before applying the design to the cake itself. With time and practice, decorators can master the art of piping intricate designs on cakes.

Welcome to my blog about home and family. This blog is a place where I will share my thoughts, ideas, and experiences related to these important topics. I am a stay-at-home mom with two young children. I hope you enjoy reading it! and may find some helpful tips and ideas that will make your home and family life even better!


